When you are buying workwear or lanyards for your business, if you want to have a logo or text printed onto the item, you will need to decide which type of printing you want, or another option is having the details embroidered on. One of the best options is to have your items screen printed, as this will give a high-quality finish at a cost-effective price.
In this guide, we walk through the different steps of screen printing and discuss the benefits of screen printing over other options.
With screen printing, you are able to add high-quality graphics onto the items, rather than compromising on graphic quality. You also have a wide range of choice when it comes to colours, whereas with other options such as embroidered graphics, there is a limited range of colours to choose from.
Screen printing allows the creation of vivid colours, even on dark fabrics, and it is added in layers rather than being just one single layer, which gives it a better level of quality. Screen printing ensures that graphics with fine details are displayed clearly.
The process of screen printing is ideal for creating bulk orders, which ensures costs can be kept down to a minimum, especially compared to alternatives such as embroidered logos.

Screen printing is a process involving pressing ink through a stencilled mesh screen to create a printed design. It is a very popular way of creating graphics for clothing, canvas or paper, but can also be used on materials such as glass, plastic, metal and wood.
These are the steps to screen printing:
1. Creating the design
The design can be created in a variety of ways, such as a business providing an existing logo already designed to the required quality. Many screen printers can also create a requested design, consulting with the customer and sending a copy to approve before moving forward.
2. Creating the stencil
Once the design is agreed, the stencil is created by printing the design onto a transparent acetate film.
3. Preparing the screen
The next stage is preparing the mesh screen. The printer chooses the most suitable mesh depending on the complexity of the design. The mesh is coated with a light reactive emulsion.
4. Exposure to light
The acetate sheet is laid onto the emulsion-coated screen, and one screen is used for each colour. The screen is exposed to very bright light, which hardens the emulsion.
5. The emulsion is washed off
Only the exposed areas harden, so the unhardened emulsion beneath the design is rinsed away. This leaves the imprint of the design for ink to pass through. The screen is dried and checked for corrections. A fan can speed up the drying process. Once correct, the stencil is ready.
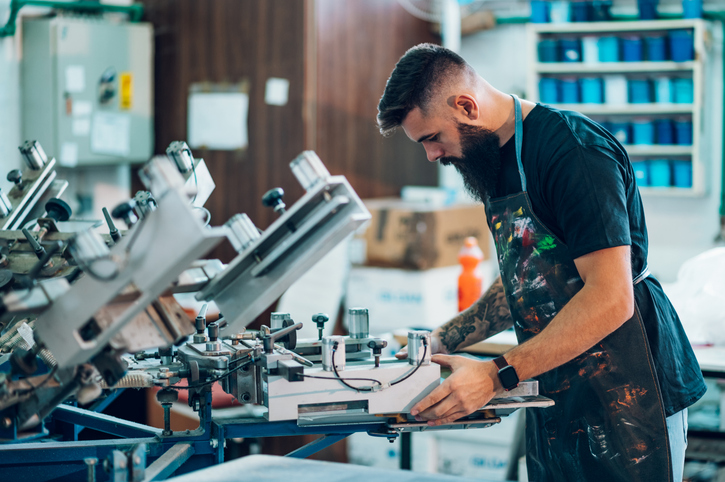
6. Printing
The stencil is placed onto the printing press. The item sits flat underneath. The screen is pressed onto the board, ink is added, and a squeegee spreads the ink so it passes through the stencil and onto the item.
7. Dry and check
The final step is drying the item using a dryer to cure the ink and give a smooth finish. The item is then ready to use.
Screen printing has long been a popular way to design t-shirt graphics and other printed products. However, newer technology such as direct-to-garment digital printing is now available.
There are pros and cons to both:
The cost depends on the number of items and the level of detail, including colour count. Screen printing is usually more cost-effective for large batches, while digital printing is often cheaper for small orders.
A wide range of products can be screen printed. Clothing is one of the most common, but many start-ups also use screen printing to personalise items such as drinking glasses, balloons and signs.
Once the equipment is purchased, only more ink is needed to continue printing, and screens can be washed and re-used many times.
Professional printing services usually offer several printing methods depending on the item and design needed. For example, a t-shirt printing company may provide both screen printing and digital printing.
The main reason is that it produces vivid colours, even on darker fabrics.
Lanyards can be made using screen printing or heat transfer printing. For multiple colours and a detailed finish, heat transfer is ideal. It is also faster, so better for urgent deliveries.
Screen printed lanyards are more suitable for up to three colours. The process gives a hard-wearing finish and is great value for money. Screen printing can be Pantone matched to your brand colours.
If you are buying a large order of lanyards for events, education or other uses, choose a professional lanyard printing company.
As well as print quality, the quality of the lanyard material and clips is important. For schools or workplaces with machinery, a safety-break lanyard is essential.
Lanyard pricing varies between companies, so compare the cost for your exact quantity, not just the per-item price. Some offer strong bulk discounts.
Check whether a company provides refunds if the print quality is poor. Reviews can also help you judge reliability and print standards. The cheapest option is not always the best.
Screen printed lanyards remain a popular choice because they are affordable while still offering a high-quality, professional finish.

Custom lanyards, exceptional every time!
